|
|
4 years ago | |
|---|---|---|
| .. | ||
| DESIGN.md | 4 years ago | |
| README.md | 4 years ago | |
README.md
Distributed MinIO Quickstart Guide 

MinIO in distributed mode lets you pool multiple drives (even on different machines) into a single object storage server. As drives are distributed across several nodes, distributed MinIO can withstand multiple node failures and yet ensure full data protection.
Why distributed MinIO?
MinIO in distributed mode can help you setup a highly-available storage system with a single object storage deployment. With distributed MinIO, you can optimally use storage devices, irrespective of their location in a network.
Data protection
Distributed MinIO provides protection against multiple node/drive failures and bit rot using erasure code. As the minimum disks required for distributed MinIO is 4 (same as minimum disks required for erasure coding), erasure code automatically kicks in as you launch distributed MinIO.
High availability
A stand-alone MinIO server would go down if the server hosting the disks goes offline. In contrast, a distributed MinIO setup with m servers and n disks will have your data safe as long as m/2 servers or m*n/2 or more disks are online.
For example, an 16-server distributed setup with 200 disks per node would continue serving files, even if up to 8 servers are offline in default configuration i.e around 1600 disks can down MinIO would continue service files. But, you'll need at least 9 servers online to create new objects.
You can also use storage classes to set custom parity distribution per object.
Consistency Guarantees
MinIO follows strict read-after-write and list-after-write consistency model for all i/o operations both in distributed and standalone modes.
Get started
If you're aware of stand-alone MinIO set up, the process remains largely the same. MinIO server automatically switches to stand-alone or distributed mode, depending on the command line parameters.
1. Prerequisites
Install MinIO - MinIO Quickstart Guide.
2. Run distributed MinIO
To start a distributed MinIO instance, you just need to pass drive locations as parameters to the minio server command. Then, you’ll need to run the same command on all the participating nodes.
NOTE:
- All the nodes running distributed MinIO need to have same access key and secret key for the nodes to connect. To achieve this, it is recommended to export access key and secret key as environment variables,
MINIO_ACCESS_KEYandMINIO_SECRET_KEY, on all the nodes before executing MinIO server command. - MinIO creates erasure-coding sets of 4 to 16 drives per set. The number of drives you provide in total must be a multiple of one of those numbers.
- __MinIO chooses the largest EC set size which divides into the total number of drives or total number of nodes given - making sure to keep the uniform distribution i.e each node participates equal number of drives per set.
- Each object is written to a single EC set, and therefore is spread over no more than 16 drives.
- All the nodes running distributed MinIO setup are recommended to be homogeneous, i.e. same operating system, same number of disks and same network interconnects.
- MinIO distributed mode requires fresh directories. If required, the drives can be shared with other applications. You can do this by using a sub-directory exclusive to MinIO. For example, if you have mounted your volume under
/export, pass/export/dataas arguments to MinIO server. - The IP addresses and drive paths below are for demonstration purposes only, you need to replace these with the actual IP addresses and drive paths/folders.
- Servers running distributed MinIO instances should be less than 15 minutes apart. You can enable NTP service as a best practice to ensure same times across servers.
MINIO_DOMAINenvironment variable should be defined and exported for bucket DNS style support.- Running Distributed MinIO on Windows operating system is experimental. Please proceed with caution.
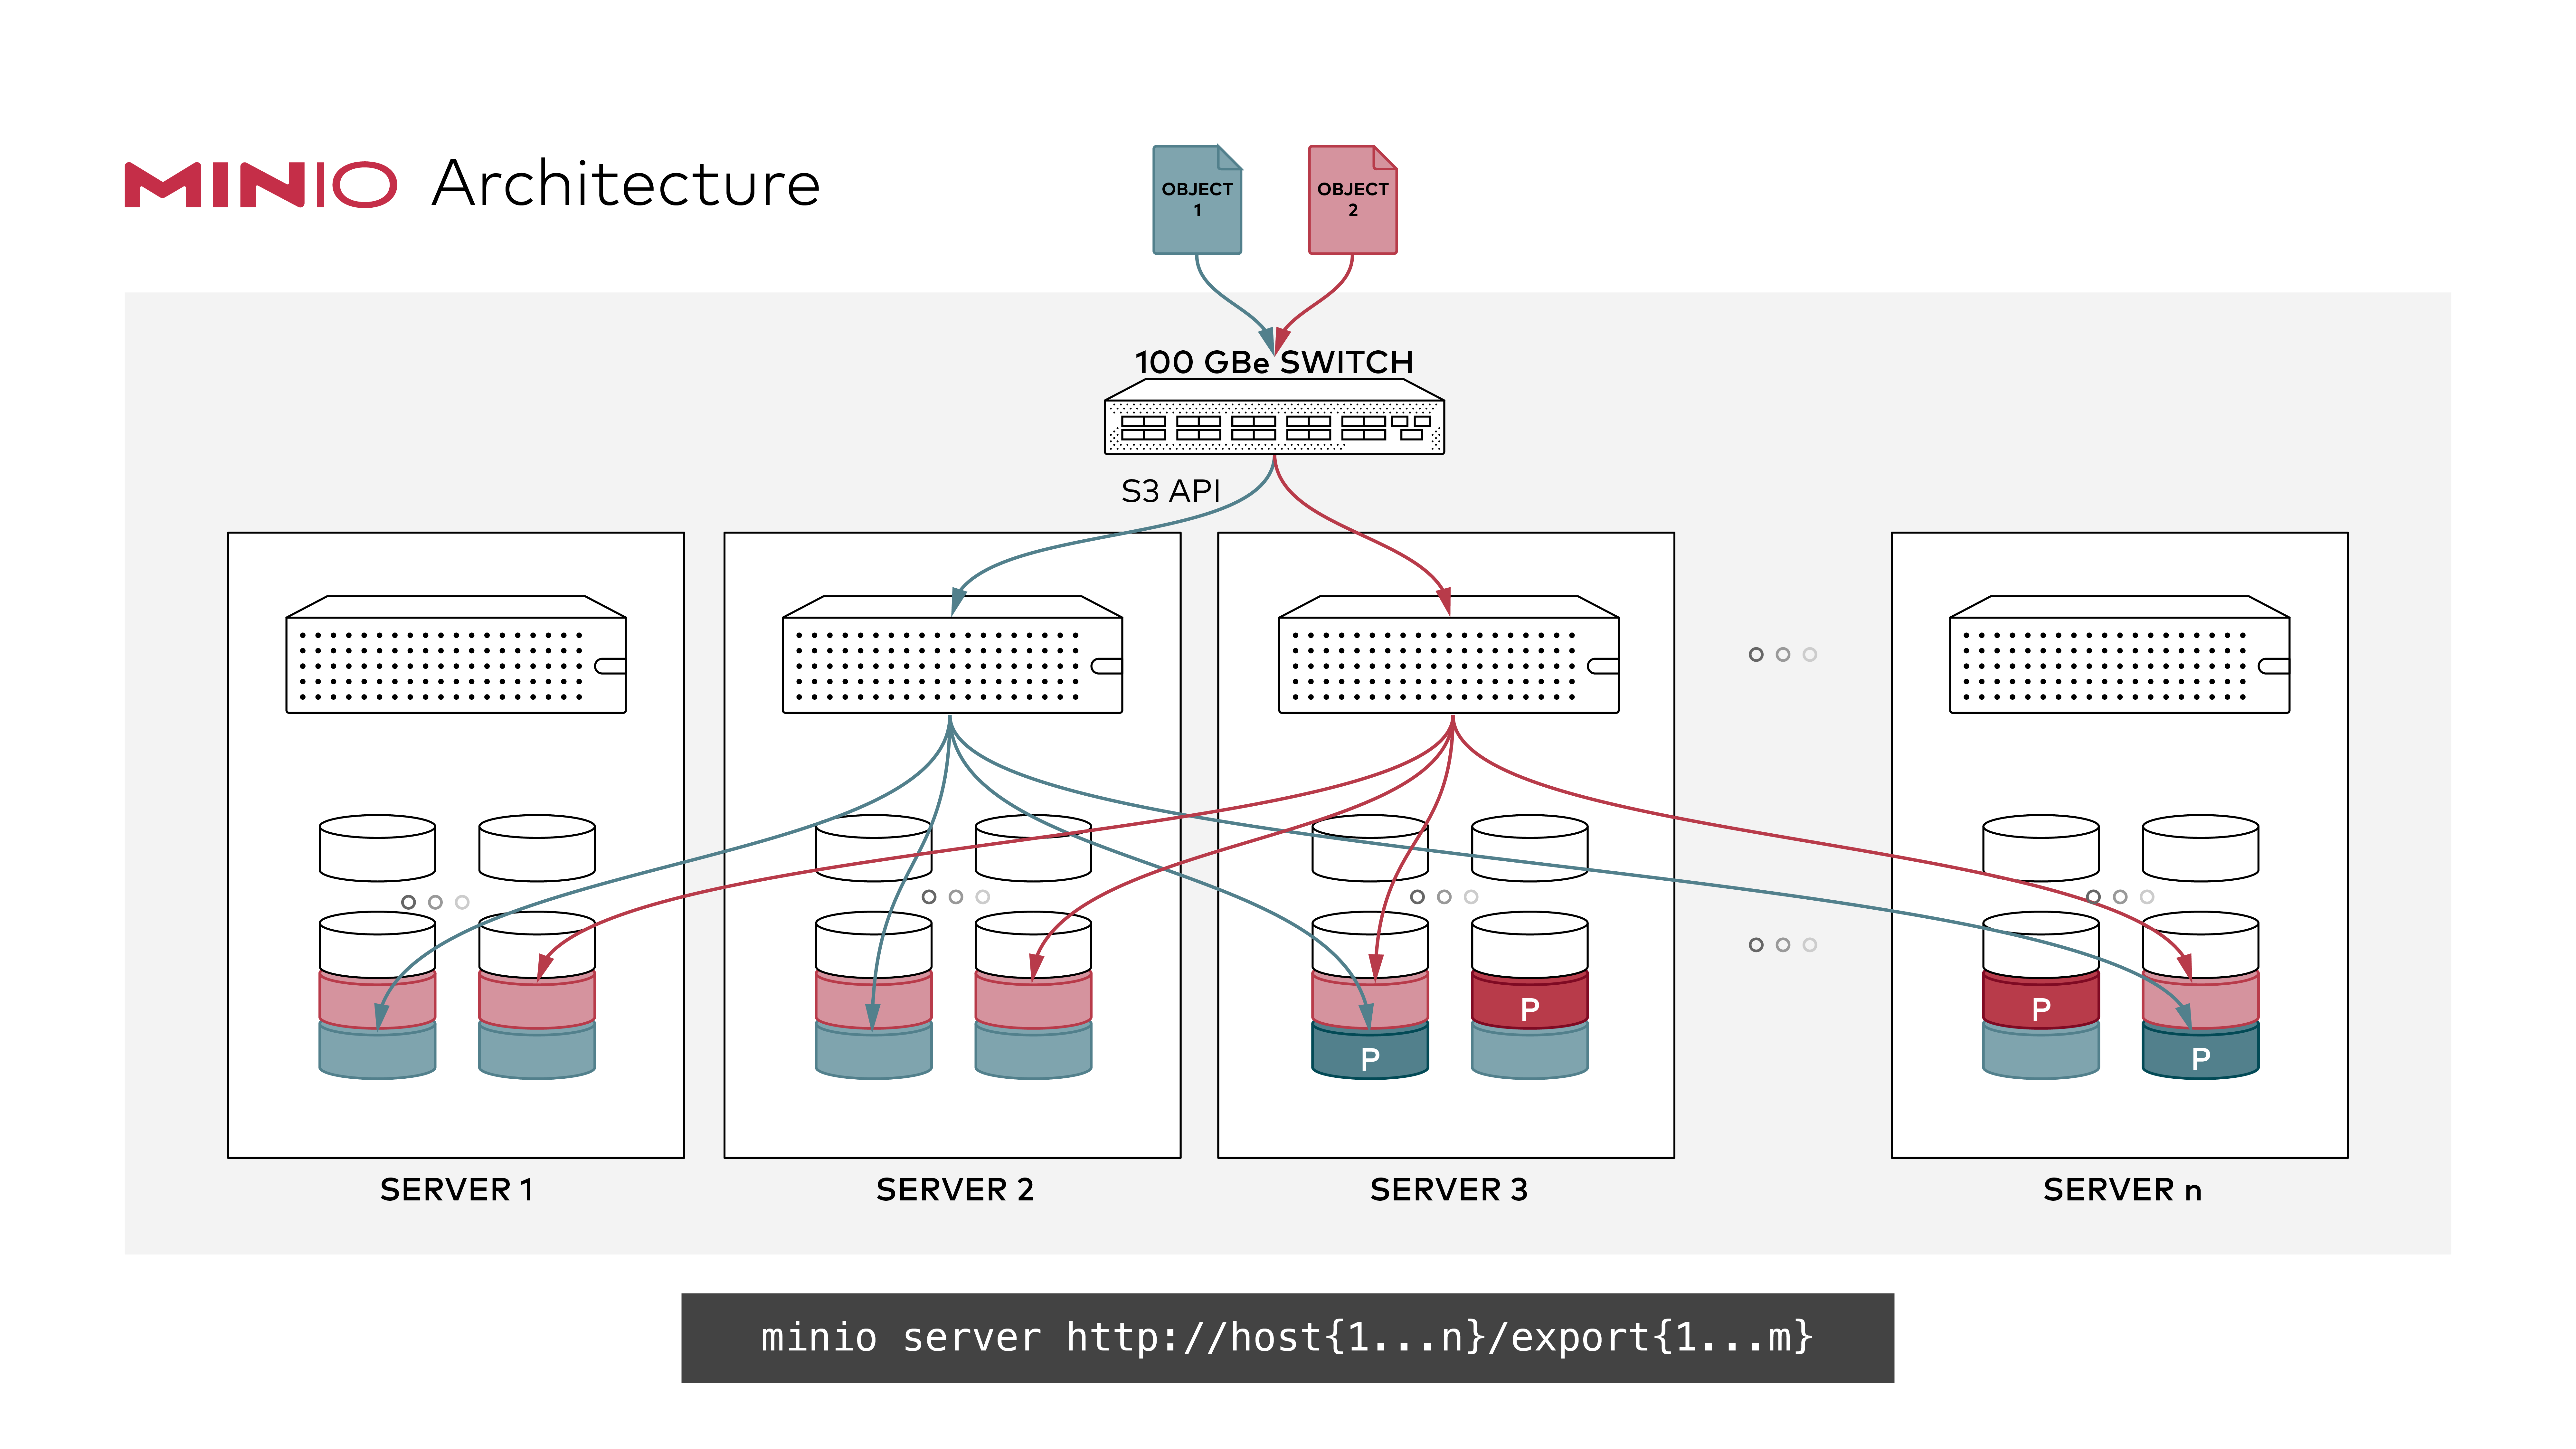
Example 1: Start distributed MinIO instance on n nodes with m drives each mounted at /export1 to /exportm (pictured below), by running this command on all the n nodes:
GNU/Linux and macOS
export MINIO_ACCESS_KEY=<ACCESS_KEY>
export MINIO_SECRET_KEY=<SECRET_KEY>
minio server http://host{1...n}/export{1...m}
NOTE: In above example
nandmrepresent positive integers, do not copy paste and expect it work make the changes according to local deployment and setup.
NOTE:
{1...n}shown have 3 dots! Using only 2 dots{1..n}will be interpreted by your shell and won't be passed to MinIO server, affecting the erasure coding order, which would impact performance and high availability. Always use ellipses syntax{1...n}(3 dots!) for optimal erasure-code distribution
Expanding existing distributed setup
MinIO supports expanding distributed erasure coded clusters by specifying new set of clusters on the command-line as shown below:
export MINIO_ACCESS_KEY=<ACCESS_KEY>
export MINIO_SECRET_KEY=<SECRET_KEY>
minio server http://host{1...n}/export{1...m} http://host{o...z}/export{1...m}
For example:
minio server http://host{1...4}/export{1...16} http://host{5...12}/export{1...16}
Now the server has expanded total storage by (newly_added_servers*m) more disks, taking the total count to (existing_servers*m)+(newly_added_servers*m) disks. New object upload requests automatically start using the least used cluster. This expansion strategy works endlessly, so you can perpetually expand your clusters as needed. When you restart, it is immediate and non-disruptive to the applications. Each group of servers in the command-line is called a zone. There are 2 server sets in this example. New objects are placed in server sets in proportion to the amount of free space in each zone. Within each zone, the location of the erasure-set of drives is determined based on a deterministic hashing algorithm.
NOTE: Each zone you add must have the same erasure coding set size as the original zone, so the same data redundancy SLA is maintained. For example, if your first zone was 8 drives, you could add further server sets of 16, 32 or 1024 drives each. All you have to make sure is deployment SLA is multiples of original data redundancy SLA i.e 8.
3. Test your setup
To test this setup, access the MinIO server via browser or mc.
